AWS Event Engine
To complete this workshop, you are provided with an AWS account via the AWS Event Engine service. A 12-digit hash will be provided to you by event staff - this is your unique access code.
For example: e8476543c00e
Logging in
Create AWS Account
Step 1
Connect to the portal by clicking the button or browsing to https://dashboard.eventengine.run/. The following screen shows up. Enter the provided hash in the text box. The button on the bottom right corner changes to Accept Terms & Login. Click on that button to continue.

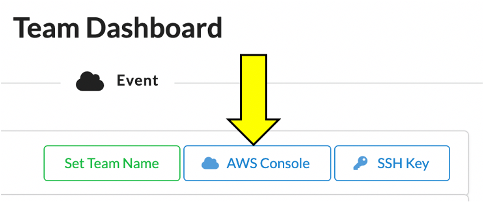
Step 2
Choose AWS Console, then Open AWS Console. This account will expire at the end of the workshop. All of the resources created will be automatically deprovisioned. You will not be able to access this account after today.
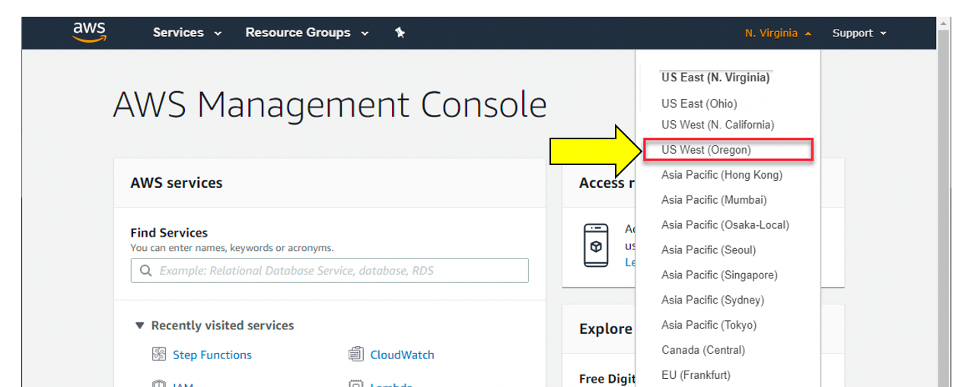
Step 4
Use a single region for the duration of this workshop. This workshop supports the following regions:
- us-west-2 (US West - Oregon)
Please select US West (Oregon) in the top right corner.
Step 5
We have simplified and automated the process for provisioning the necessary AWS services needed for this workshop. This is possible through the Snyk controller for Amazon EKS AWS Quick Start. By clicking on the Launch Stack button below, you will be redirected to the AWS CloudFormation console where you will be prompted to complete the following steps:
- Create stack, select appropriate AWS region click Next
- Specify stack details, input EKS cluster name & Snyk integration ID click Next
- Configure stack options, click Next
- Scroll to bottom section under Capabilities and click Create stack
When you are ready, click the button below!

Proceed to Getting Started
Once you have completed the step above, you can leave the AWS console open. You can now move to the Getting Started section.